
5 Camera Tips for Your Webinar: Framing, Settings and Light

Kiki
31 de julio de 2024 - 8 min - Actualizado: 02 de octubre de 2026
Key takeaways:
Composition does most of the work. Place the lens at eye level, about an arm's length away, with your eyes on the upper third of the frame, and even a basic 1080p webcam looks professional.
Lock your settings instead of relying on auto. Keep ISO low, use a 1/50 shutter at 25 fps to avoid flicker under European 50 Hz lighting, and set white balance manually (around 5600K for daylight).
Light matters more than hardware. Face a window or a soft light, never sit with a bright window behind you, and use free software like OBS to fine-tune the rest.
A good webinar camera setup comes down to five things: placing the lens at eye level with your eyes on the upper third of the frame, choosing a shot size that suits your content, locking your camera settings instead of leaving everything on auto, controlling daylight and adding a steady light source, and using software like OBS to fine-tune the image. You don't need expensive gear to get this right. Most of the difference between an amateur feed and a professional one comes from positioning and light, not from the camera itself.
Our broadcast operator Walter walks through each tip in the video above. Below, we go a little deeper, with concrete settings you can copy for your own setup, whether you use a laptop webcam, an external webcam or a professional camera as a webcam.
1. Put the lens at eye level and use the rule of thirds
The rule of thirds is a composition guideline used in design, photography, film and video. You divide the frame into nine equal parts with two horizontal and two vertical lines, and use those lines and their four intersections to position your subject.
For a webinar, the most useful line is the top one. Place your eyes on or just below the upper horizontal line, roughly in the centre of the frame, and you automatically get a natural amount of space above your head without zooming in too far. Walter demonstrates it here:
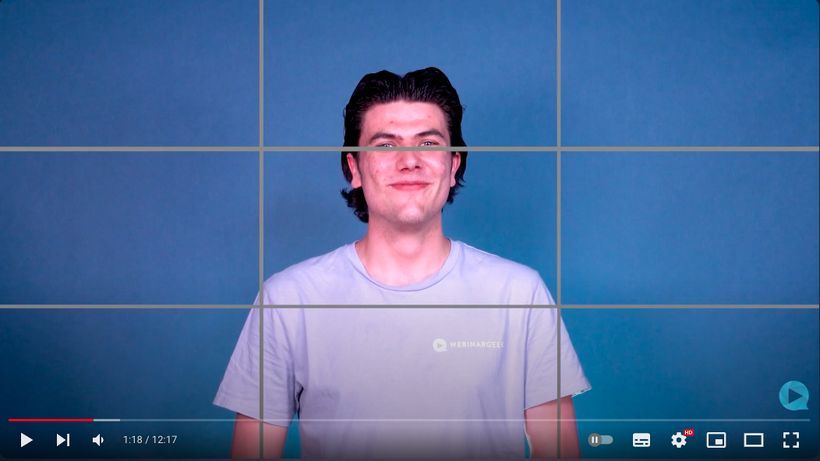
Height matters just as much as composition. Set the camera lens at eye level, or very slightly above, so viewers aren't looking up your nose or down on your forehead. If you're on a laptop, a stack of books or a laptop stand usually does the trick. Keep the camera about an arm's length away (roughly 60 to 90 cm), which avoids the distorted, wide-angle look you get when you sit too close to a webcam.
One more small habit that pays off: keep your notes or speaker view close to the camera, so your eyes naturally stay near the lens instead of drifting off to the side. For more on posture and presence, see our guide on how to make yourself look good on webcam.
2. Choose the right framing for your content
Framing is about how large you appear in relation to the background. Two choices shape it: the angle of the camera and how far it's zoomed in.
The angle changes how your audience perceives you:
Eye level: neutral and conversational. This is the default for almost every webinar.
Bird's-eye view: the camera looks down from a high angle, which can make the speaker look smaller or less confident.
Worm's-eye view: the camera looks up from a low angle, which tends to feel dominant and is rarely flattering on a webcam.
Shot size, meanwhile, decides how much of you and your surroundings people see. The most common options run from close to wide: detail shot, close-up, medium close-up, medium shot, wide shot and extreme wide shot.
For most webinars, a medium close-up (head and shoulders, cut around the chest) is the safest choice. It feels personal, shows your facial expressions clearly and still works in a small video tile next to your slides. A close-up suits emotional or personal content, like a founder story or a customer testimonial. A wider medium shot, showing more of your upper body and hands, comes across as more authoritative and works well for keynote-style presentations, product demos or sessions where you gesture a lot.
Whatever you choose, keep in mind that your background is part of the frame too. Our broadcast operator shares practical advice on backdrops, and if you plan to show your camera next to slides, it helps to check how your framing looks in different webinar layouts.
3. Lock your camera settings instead of relying on auto
Once you understand three basic settings, ISO, aperture and shutter speed, setting up a camera becomes a lot less intimidating. Add white balance and focus, and you have everything you need for a stable, professional image.
ISO controls how sensitive the sensor is to light. The name comes from the International Organization for Standardization, which defined the scale. A higher ISO brightens the image, but push it too far and the picture turns grainy. Keep ISO as low as your lighting allows, and if the image looks noisy, add light rather than raising ISO further.

Aperture works like the iris of your eye. A wider aperture (a lower f-number, like f/2.8) lets in more light and gives you a softly blurred background. A narrower aperture (a higher f-number, like f/8) lets in less light and keeps more of the scene sharp. For a seated presenter, something between f/2.8 and f/4 usually keeps your face in focus while gently separating you from the background.
Shutter speed is how long the sensor is exposed to light for each frame. For video, the standard guideline is the 180-degree rule: set the shutter to roughly double your frame rate. At 25 frames per second that means 1/50, at 50 fps it means 1/100. If you're broadcasting in Europe, sticking to 25 or 50 fps with these shutter speeds also prevents the flickering you can get from LED and fluorescent lights running on 50 Hz mains power.
White balance and focus are where most webcams go wrong. On auto, the colour of your skin can shift every time a cloud passes or you lean forward. Set white balance manually (around 5600K for daylight, around 3200K for warm indoor bulbs) and lock focus on your face, so the camera doesn't hunt when you move your hands.
If you're using a regular webcam, you won't have every setting available, but you can usually set resolution, frame rate, exposure, white balance and focus. Aim for 1080p at 25 or 30 fps, which is plenty for a webinar stream. Want to step up without buying new gear? You can also use your phone camera as a webcam, which often beats a built-in laptop camera.
4. Control sunlight and add a steady light source
Light has more impact on your image quality than any camera upgrade. Sunlight in particular can work for you or against you. Used well, soft daylight gives a beautiful, almost cinematic look. Used badly, it causes overexposed patches, harsh shadows or the classic silhouette effect, where your face disappears against a bright window.
A few rules keep daylight under control:
Face the window, don't sit with it behind you. Light from the front or slightly to the side lights your face evenly.
Avoid direct sunlight on your face or lens. Sheer curtains or blinds soften it and make it more even.
Plan for the sun moving. Daylight changes during a 45-minute session, so test your setup at the same time of day you'll go live.
Because daylight is unpredictable, it's worth adding at least one artificial light. Place a soft light source slightly above eye level and a little to the side of your camera, so it lights your face without glaring in your glasses. A second, weaker light on the other side fills in shadows, and a small light behind you adds depth by separating you from the background. Try to match colour temperatures, because mixing warm bulbs with cool daylight leaves your face with odd colour casts that are hard to correct.
Not sure what to buy? Our ultimate guide to webinar tech equipment covers lights, cameras and microphones, and you can build a surprisingly good setup on a budget with our tips for a low-cost professional webinar studio.
5. Use software like OBS to fine-tune your image
Software can fix a lot of what your camera can't. OBS Studio is free, open-source broadcasting software that lets you adjust brightness, contrast, colour and sharpness, crop and resize your camera feed, and add overlays or scenes. If your webcam's own settings are limited, OBS gives you far more control. It's also a friendly option if you're less technically inclined, since most adjustments are simple sliders with a live preview.
You can then use the OBS virtual camera as your camera source in your webinar, so every correction carries straight into your broadcast. We explain the full process in Optimize your webcam with OBS, and Walter shows it step by step in this video:
Once your camera looks good, you can take it further with overlays in OBS or even a multi-camera setup.
Webinar camera checklist before you go live
Run through this a day before, and again 15 minutes before you start:
Camera lens at eye level, about an arm's length away
Eyes on the upper third line, with a little headroom
Medium close-up framing, background tidy and on-brand
Resolution set to 1080p, frame rate 25 or 30 fps
Auto exposure, auto white balance and autofocus locked where possible
Main light in front of you, no bright window behind you
Test recording checked for flicker, grain and colour
Frequently asked questions about webinar cameras
Where should I position my camera for a webinar?
Place the camera lens at eye level or slightly above, about an arm's length (60 to 90 cm) from your face. Frame yourself so your eyes sit on the upper third of the image. This avoids unflattering angles and makes it feel like you're talking directly to your audience.
What resolution and frame rate should I use for a webinar camera?
1080p (Full HD) at 25 or 30 frames per second is the sweet spot for webinars. 4K rarely adds visible quality once the stream is compressed, and it puts extra load on your computer and upload connection.
Why does my webcam image look grainy?
Grain is almost always caused by too little light, which makes the camera push its ISO or gain up. Adding a soft light in front of you, or facing a window, will do more for a grainy image than buying a new camera.
Why is my webcam image flickering?
Flicker usually comes from a mismatch between your camera's shutter speed or frame rate and the frequency of your lights. In Europe, where mains power runs at 50 Hz, use 25 or 50 fps with a shutter speed of 1/50 or 1/100, or set your webcam's anti-flicker option to 50 Hz.
Frequently asked questions
Is a laptop webcam good enough for a webinar?
For internal sessions, often yes, as long as you raise the laptop to eye level and light your face well. For customer-facing or recorded webinars, an external 1080p webcam or your smartphone camera usually gives a noticeably sharper, more stable image.
Can I use a DSLR or mirrorless camera for webinars?
Yes. Many DSLR and mirrorless cameras can work as a webcam through the manufacturer's webcam software or a capture card, and they give you a better image and real control over aperture and depth of field. Use a dummy battery or power adapter so the camera doesn't run out halfway through.
Should I look at the camera or the screen during a webinar?
Look at the camera when you're addressing your audience directly, like in your introduction, key points and call to action. Keeping your notes or slides just below the lens makes it easier to glance down without breaking eye contact for long.
What is the best camera angle for online presentations?
A straight-on angle at eye level is the most natural and works for almost every type of webinar. High angles can make you look smaller, and low angles tend to feel confrontational and are rarely flattering on a webcam.
Look your best on camera. Try WebinarGeek free.
Start free trial